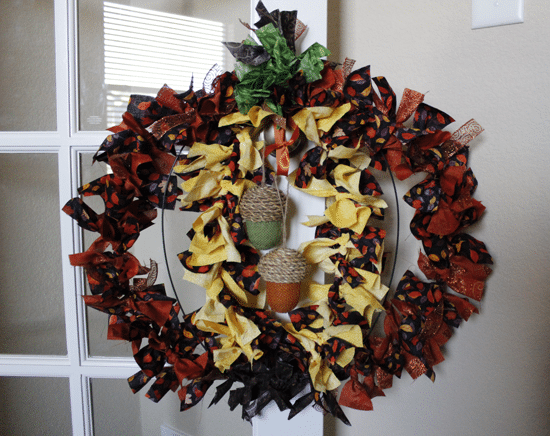

How to Make a Simple Fall Fabric Wreath
Fall Fabric Wreath
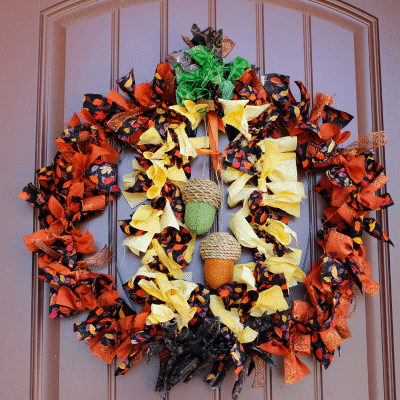
Our Simple Fall Fabric Wreath is one of the easiest fall wreath projects I’ve made! With a combination of pretty fall fabric, glittery ribbon, and a metal form, you can quickly put together a lovely entry wreath to grace your door.
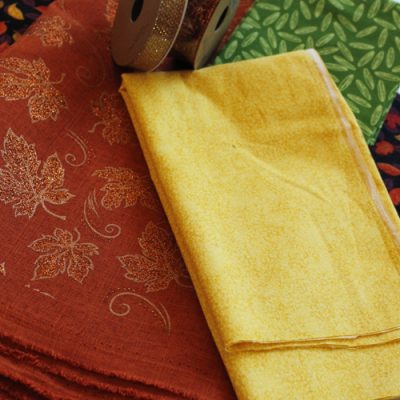
The supplies are fairly simple. I bought more fabric than I needed, so I’m giving rough estimates. Also, I chose a pumpkin shape, so my frame has a ‘stem’, and you may not have this. Think about your frame before choosing your fabric.
[clickToTweet tweet=”Make a simple autumn wreath that is quick, easy and pretty! ” quote=”Make a simple autumn wreath that is quick, easy and pretty! ” theme=”style1″]
I used one dominant color, which is mixed with a coordinating color for the outside, one green, and a contrasting inside color again that is mixed with the dominant fabric. For the ribbon, the transparent, glittery ribbon tied well. Avoid any stiff fabric or ribbon.
I used one dominant color, which is mixed with a coordinating color for the outside, one green, and a contrasting inside color again that is mixed with the dominant fabric. For the ribbon, the transparent, glittery ribbon tied well. Avoid any stiff fabric or ribbon.
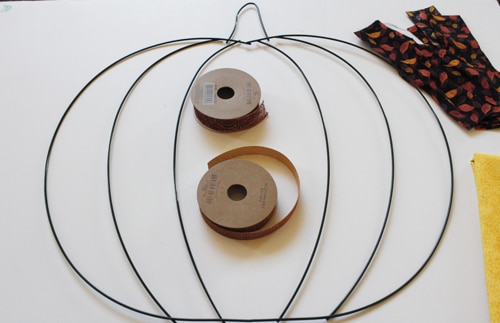
We bought our frame from JoAnns. They have many cute wire frames for autumn.
How to Make a Simple Fall Fabric Wreath
Materials
- Wire frame
- Dominate fabric 1 1/2 yd
- Coordinating fabric 1 yd
- Stem fabric 1 fat quarter brown scraps
- Contrasting fabric 1 yd
- Ribbon 4 spools 9 yds each, width is your choice.
- Bells, fall ornaments, etc. if you wish to tie them in or hand them in the middle.
Tools
- Cutting Mat
- Rotary Cutter
- Ruler
Instructions
- Cut strips of fabric 6-7" long, and 2" wide. The ribbon is cut 6-7" long. It's easier on your fingers if they are 7", and you can trim later if needed. I started by cutting stacks of each fabric.
Start Tying
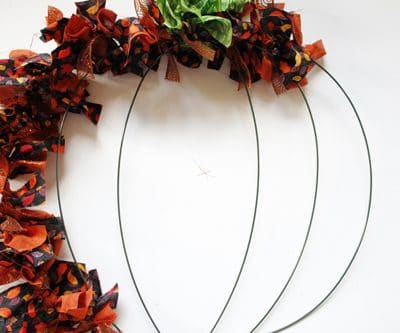
- Here we go, get ready for easy! Take your strips and tie them on, with ONE knot. If you are doing a pumpkin, start with the stem. I found it difficult to do this after starting on the side. Add green all around, add ribbon, trim with scissors if it's too long. Add a few brown scraps to the stem. Add ribbon between strips.
- Starting on the outside, establish an order. For example, dark, coordinating, coordinating. I did this 8x or so, then added a glittery ribbon tie. I repeated until the side was full. Repeat with the other side.
- If you have brown scraps that can be evenly cut into strips, add these to the bottom.
Inside Frame
- For a pumpkin frame, I did the very inside only. I left the wire empty right next to the outside frame blank to avoid a crowded look.
- Continue tying the middle frame, using your contrasting and dominant fabric.
- Using ribbon tie in bells or ornaments in the middle. This is finished! So, so easy. I think it took me two hours to complete. Enjoy!
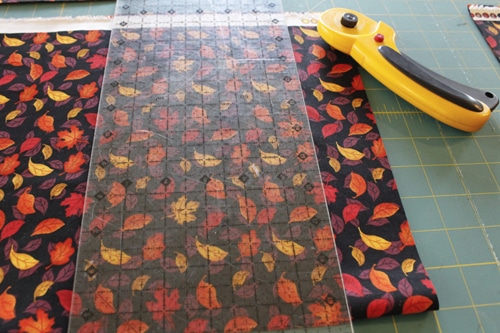
Cut strips of fabric 6-7″ long, and 2″ wide. Ribbon is cut 6-7″ long. It’s easier on your fingers if there are 7″, and you can trim later if needed. I started by cutting stacks of each fabric.
Start Tying
Here we go, get ready for easy! Take your strips and tie them on, with ONE knot. If you are doing a pumpkin, start with the stem. I found it difficult to do this after starting on the side. Add green all around, add ribbon, trim with scissors if it’s too long. Add a few brown scraps to the stem. Add ribbon between strips.
I tied one side at a time. Starting with the outside, establish an order. For example, dark, coordinating, coordinating. I did this 8x or so, then added a glittery ribbon tie. I repeated until the side was full. Repeat with the other side.


If you have brown scraps that can be evenly cut into strips, add these to the bottom.
Inside Frame
For a pumpkin frame, I did the very inside only. I left the wire empty right next to the outside frame blank to avoid a crowded look.
Continue tying the middle frame, using your contrasting and dominant fabric.
Using ribbon tie in bells or ornaments in the middle. This is finished! So, so easy. I think it took me two hours to complete. Enjoy!